2016의 게시물 표시

MySQL datetime 날짜로 select하기

MySQL datetime 날짜로 select하기 select 컬럼명 from 테이블명 where date(컬럼명)='2018-01-23'; select 컬럼명 from 테이블명 where 컬럼명 between '2018-01-20' and '2018-01-24'; 위의 2가지 방법이 가장 기본적인 쿼리이다.

JAVA 이진탐색 알고리즘

이미지
이진탐색 Binarysearch 이진탐색(binary search)는 정렬되어 있는 자료들의 집합에서 특정 자료를 찾고자 할 때 많이 사용되며 매우 빠른 탐색 알고리즘이다. 이미지 출저 : http://anster.tistory.com/152 위의 그림 처럼 임의의 숫자가 가능한지 아닌지를 알아내기 쉬운 방법이다. JAVA 코드 public class Binarysearch { public static void main(String[] args) { int[] arr = { 1, 2, 3, 4, 5, 6, 7, 8, 9 }; binarySearch(2, arr); } public static void binarySearch(int iKey, int arr[]) { int mid; int left = 0; int right = arr.length - 1; while (right >= left) { mid = (right + left) / 2; if (iKey == arr[mid]) { System.out.println(iKey + " is in the array with index value: " + mid); break; } if (iKey < arr[mid]) { right = mid - 1; } else { left = mid + 1; } } } }

JAVA 퀵 정렬 알고리즘

이미지
퀵 정렬 QuickSort -임의의 숫자를 기준(Pivot)으로 작거나 같은 값을 지닌 숫자는 앞으로, 큰 값을 지닌 숫자는 뒤로 가도록 하여 작은 값을 갖는 숫자와 큰 값을 갖는 숫자로 분리해가며 정렬 -데이터가 실시간으로 입력되고 있을 때 효율적 이해하기 위한 동영상 JAVA 코드 public class QuickSort {         public void sort(int[] data, int l, int r){         int left = l;         int right = r;         int pivot = data[(l+r)/2];                 do{             while(data[left] < pivot) left++;             while(data[right] > pivot) right--;             if(left <= right){                   int temp = data[left];                 data[left] = data[right];                 data[right] = temp;                 left++;                 right--;             }         }while (left <= right);         if(l < right) sort(data, l, right);         if(r > left) sort(data, left, r);     }        public static void main(String[] args) {         int data[] = {66, 10, 1, 34, 5, -10};             Quick quick = new Quick();         quick.sort(data, 0, data.length - 1);        

JAVA 병합정렬 알고리즘

이미지
병합정렬 MergeSort   -보통 데이터가 엄청 많을때 사용하는 방식 -쪼갠 후에 쪼개진 아이끼리 순서를 맞춰줘서 병합 후에 다시 맞추고 가는 방식 이해를 위한 동영상 자바 코드 public class MergeSort { public static void main(String[] args) { //1. 입력 : 원본 데이터가 정렬되어있다고 가정, 오름차순 int[] first = {1, 3, 5}; int[] second = { 2, 4 }; int[] mearge = new int[first.length + second.length]; // MEARGE될 배열 int i = 0, j = 0, k = 0; //i : first 인덱스 , j : second 인덱스, k : mearge 인덱스 int m = first.length; int n = second.length; //2. 처리 while(i < m && j < n){ if(first[i] <= second[j]){ mearge[k++] = first[i++]; }else{ mearge[k++] = second[j++]; } } while(i<m){ mearge[k++] = first[i++]; } while(j<n){ mearge[k++] = second[j++]; } //3. 출력 for(int p = 0; p< mearge.l

JAVA 삽입정렬 알고리즘

이미지
삽입정렬 InsertionSort 가장 큰 ( 작은 ) 값을 시작으로 보내고 , 남은 데이터를 적당한 위치에 삽입하며 정렬 된 영역을 키워간다 . 이해하기 쉬운 영상 자바 코드 public class InsertionSort {   public static void main(String[] args) {     int[] index = { 4, 1, 3, 5, 2 };     int i, j, temp, in;     for (i = 1; i < index.length; i++) {       in = index[i];       for (j = i - 1; (j >= 0) && (in < index[j]); j--) {         index[j + 1] = index[j];       }       index[j + 1] = in;     }     for (i = 0; i < index.length; i++) {       System.out.print(index[i] + " ");     }   } }

JAVA 선택정렬 알고리즘

이미지
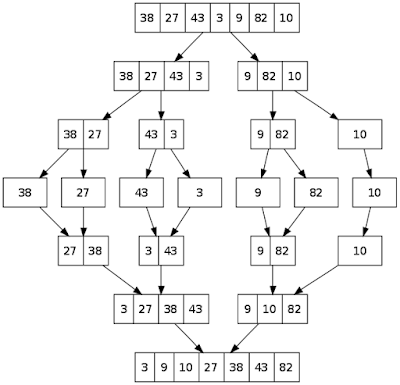
선택정렬 SelectionSort 가장   큰 ( 작은 )  값을   끝으로   보내고 ,  작아진   영역에서   동일한   처리를   반복해   나간다 .  교체작업을 한다. 간단한 예로 3,5,7,9,1,4 로 구성된 배열이 있다고 하자. 1 까지   확인   후에  9 를   맨   뒤로   보냄 ( 4 와   교환 )   결과 :   3,5,7,4,1,9 다음   다시  1 까지   검사   후   가장   큰   값   맨   뒤로   보냄 가장 큰 값이었던 9 전으로 이동  결과 : 3,5,1,4,7,9 다음 결과 : 3,4,1,5,7,9 다음 결과 : 3,1,4,5,7,9 마지막 결과 : 1,3,4,5,7,9 쉬운 이해를 돕기 위한 동영상 자바 코드 public class SelectionSort { public static void main(String[] args) { int indexMin, temp; for (int i = 0; i < list.length - 1; i++) { indexMin = i; for (int j = i + 1; j < list.length; j++) { if (list[j] < list[indexMin]) { indexMin = j; } } temp = list[indexMin]; list[indexMin] = list[i]; list[i] = temp; } } }

Ionic BarcodeScanner 를 이용한 QRcode 인식!

이미지
내 프로젝트에서 QRcode를 스캔하는 기능이 필요하여 그 기능을 추가했다. 간단하게 할 수 있다. 처음으로 콜도바 설치 후에 플러그인 설치 cordova plugin add https : / / github .com / wildabeast / BarcodeScanner .git 다음으로 index.html <script src = "js/ng-cordova.min.js" > </script>          <script src = "cordova.js" > </script> 위의 내용을 추가해준다. app.js 수정 angular . controller('QRController', function($scope, $rootScope, $cordovaBarcodeScanner, $ionicPlatform) { 2 3 4 5 6 7 8 9 10 11 12 13 $ionicPlatform.ready(function(){ $scope.scan = function() { $cordovaBarcodeScanner .scan() .then(function(barcodeData) { alert(JSON.stringify(barcodeData)); }, function(error) { alert(error); }); }; }); }) 만들고 싶은 곳에 버튼 생성 2 3 4 5 6 7 8 9 10 11 12 13 <ion-content style="background: #e8ebf1;" class="padding"

Github 팀으로 작업해보기(1) 프로젝트 올리기

이미지
 깃허브에서 팀으로 작업하는 방법을 간단하게 적어 두기위해 시작합니다~ 저는 맥을 사용합니다. 첫 번째로 터미널에서 생성한 프로젝트의 경로를 찾아 간다. 들어간 후에 $git init $git add . $git commit -m "commit comment" //commit 명령어로 버전관리를 한다. 커밋하는 설명을 적으면 된다.  다음에 깃허브 사이트에서 새로운 repository를 생성해 준다. $git remote add origin https://github.com/yourID/yourPJname.git //remote로 깃허브에서 생성한 repository의 https를 등록한다. $git push -u origin master //깃허브에 파일을 저장하는 명령어 이다.

Ionic project tab 위치 변경

이미지
아이오닉을 시작 하면 iOS는 하단에 텝이 생기고 Android는 텝이 상단부에 생긴다. 이것은 서로 추구하는 디자인? 이 틀리기 때문이다.   이것을 간단하게 고칠 수 있다. app.js에 들어가서 간단하게 아래 코드를 삽입하면 끗! .config(['$ionicConfigProvider', function($ionicConfigProvider) {     $ionicConfigProvider.tabs.position('bottom'); // other values: top     }]);

APM 구버전 설치 (4) PHP 5.2 and phpMyAdmin

#php설치를 가장 조심해서 해야 할 듯 싶다. 내가 많이 해보진 않았지만 초반과정에서 인스턴스만 약 30개 가량 지웠다 다시만들었다를 반복한듯.. &PHP설치 1.압축풀고 설치하고! $wget 'http://storage.googleapis.com/google-code-attachments/php52-backports/issue-16/comment-2/libxml29_compat.patch' $patch -p0 < ./libxml129_compat.patch $./configure --prefix=/usr/local/server/php  --with-mcrypt  --with-apxs2=/usr/local/server/apache/bin/apxs --with-mysql=/usr/local/server/mysql  --with-mysqli= /usr/local/server/mysql/bin/mysql_config --with-config-file-path=/usr/local/server/apache/conf --disable-debug --enable-safe-mode --enable-track-vars --enable-sockets --with-mod_charset --with-charset=utf8 --with-xml --with-language=korean --enable-curl --enable-mailparse --enable-calender --enable-syssvsem=yes --enable-sysvshm=yes --enable-ftp --enable-magic-quotes --enable-gd-native-ttf --enable-url-includes --enable-trans-id --enable-inline-optimization --enable-bcmath --with-jpeg --with-png --with-zlib --with-jpeg-dir=/usr --with-png-d

APM 구버전 설치 (3) Apache

1.압축부터 푸렁 2.설치 $./configure --prefix=/usr/local/server/apache --enable-mods-shared=all --enable-so --enable-rewrite $make && makeinstall 3.Apache를 자동 실행하기 위해 설정하고, chkconfig를 할 수 있게 하기 위해서 실행 스크립트 파일에 순서대로 추가한다. $cp /usr/local/server/apache/bin/apachectl /etc/init.d/httpd $vi /etc/init.d/httpd #초반부에 추가 #!/bin/sh # # chkconfig: 2345 90 90 # description: init file for Apache server daemon # processname: /usr/local/server/apache/bin/apachectl # config: /usr/local/server/apache/conf/httpd.conf # pidfile: /usr/local/server/apache/logs/httpd.pid $chkconfig --add httpd $chkconfig --list | grep httpd httpd          0:off     1:off     2:on     3:on     4:on     5:on     6:off 4.Apache의 환경을 설정한다. $vi /usr/local/server/apache/conf/httpd.conf :set number 명령어를 쳐 주면 숫자가 보인다. 118,119를 변경 User daemon > User nobody Group daemon > Group nobody 150을 변경 #ServerName 192.168.100.2:80 > ServerName 너의주소:80 5.이제 Apache를 실행하면 된다. $/etc/init.d/httpd

APM 구버전 설치 (2) MySQL

%보통 나는 sudo 모드를 사용하지 않고 sudo를 매번 써주면서 한다. (My style) 1.mysql 압축 풀고  폴더로 들어가서 2.Mysql을 실행할 계정을 만든다. $useradd -M -s /bin/false mysql 3.설치하기 $./configure --prefix=/usr/local/server/mysql --with-extra-charsets=all $make $make install 4.MySQL에서 사용할 환경 설정 파일을 /etc에 복사한다. huge 1~2G large 512M medium 64~256M small 64M미만 $cp support-files/my-huge.cnf /etc/my.cnf 5.MySQL을 관리 할 데이터 베이스를 생성한다. $sudo /usr/local/server/mysql/bin/mysql_install_db --user=mysql $chown -R root . $chown -R var $chgrp -R mysql . 6.MySQL 명령어를 편하게 사용 할 수 있게 환경변수에 등록한다. $sudo vi ~/.bash_profile #path 부분  PATH=$PATH:$HOME/bin:/usr/local/server/mysql/bin export PATH unset USERNAME #즉시적용 $source ~/.bash_profile #chkconfig를 이용하여 재부팅이 되어도 MySQL이 자동으로 실행 될 수 있게 설정한다. $cp share/mysql/mysql.server /etc/init.d/mysqld $chkconfig -add mysqld #등록된 것을 확인한다. $chkconfig --list | grep myslqd mysqld         0:off     1:off     2:on     3:on     4:on     5:on     6:off 처음으로 MySQL

ionic platform add android-Error: Error validating package name. Package name must look like: com.company.Name (English)

이미지
When I use 'sudo ionic platform add android' The problem can be fixed by editing config.xml. Find the line that starts with The syntax inside id="" must be com.company.(company name) It's very easy :)

Ionic Tab 디폴트 값 정하기

이미지
Ionic 으로 개발을 하는 중에  텝이 맨 마지막것이 시작하자마자 디폴트로 정해져서 아주 맘에 안든다. 요론 식으로 로그인 쪽으로 가있는 것을 발견했다. 단 한 부분만 바꿔주면 쉽게 바꿀 수 있다. routes.js에서 otherwise 다음 부분을 수정 하면 된다. 나 같은 경우는 page3부분이 page5로 설정 되어 있어서 3으로 바꾸어 줬더니 성공!

이 블로그의 인기 게시물

3계층 구조( 3 Tier Architecture )

GET방식과 POST방식이란? ( PHP )

MySQL Index태우기가 뭐에요?